A lot of folks look at dandelions as a weed, a nuisance, something to be combatted removed at any cost. I see a dandelion and I think of dimpled hands, smiling faces and bright yellow bouquets offered with lots of sunshiny sweetness and pride in a gift well chosen.
“Penny Pinching Peach is a participant in the Amazon Services LLC Associates Program, an affiliate advertising program designed to provide a means for sites to earn advertising fees by advertising and linking to Amazon.com”
Many people see dandelions as pesky plants they want to eradicate. I see a beautiful bloom that speaks of love and innocence.
I’m sure most people list something fancier as their favorite flower, like roses or tulips, and I understand that. I love those, too. They are lovely to look at, last longer, and smell sweeter than the humble yellow blossom that I’m so fond of. Fancy flowers can’t compete with dandelions and the feelings they evoke in my heart, though.
Sweet Smiles of Spring!
These plain and simple flowers have been handed to me by sticky hands, accompanied by the biggest, most genuine proclamations of “I love you!” that you can imagine, with slobbery sweet kisses and tight hugs from dirty little arms. I have very early memories of running to my mom with a sunny bouquet picked with all the love in my little heart and seeing the smile it put on her face. Dandelions bring up so many memories of sunshine and love, that I wouldn’t trade for anything in the world.
To me, dandelions are a symbol of all things sweet and special, generous and innocent about childhood and the love of the children God has allowed to touch my life!
If your kids are like mine, they love to play games together. However, it’s really hard to find a game that is fun for my very smart five year old, while being simple enough for my determinedly independent two year old to do with little to no assistance.
“Penny Pinching Peach is a participant in the Amazon Services LLC Associates Program, an affiliate advertising program designed to provide a means for sites to earn advertising fees by advertising and linking to Amazon.com”
Educational Insights The Sneaky, Snacky Squirrel Game is one of those rare amazing finds! They received this as a gift from a sweet friend of mine a few months ago, and they still play with it at least a couple of days a week. If you’ve been around little ones much, you know that this means this game is awesome if it’s surviving and still enjoyed regularly after that long!
If your child is old enough to know his colors well, or has an honest older sibling who can assist them nicely, you can let them sit at the table and play while you putter around the house getting things done. Since I initially helped them learn to play and they completely got the hang of it, which took about three or four games in all, they have rarely needed my assistance for anything except occasionally reminding Bambam to take turns when it’s not his turn. If you’re a mom, you know how valuable games and toys that encourage independent play can be for both you and your children. If you’re not, trust me when I say both parents and children will be happy with you for this gift for that very reason! 😉
Sneaky Snacky Squirrel Playing
Every piece of this game has proven to be sturdy enough to withstand the normal treatment of a little boy who earned every ounce of his nickname, Bambam, with all of that playing time. Both of my kiddos love their Sneaky, Snacky Squirrel game enough to willingly clean up and keep from losing the cutesy squirrel pinchers and numerous multi-colored acorns. The adorable tree shaped box is even much sturdier than the average game, so it’s still completely intact, as well. The only thing I would add is that if you have little ones who still put things in their mouths, please keep this game and it’s pieces safely away from that child, since the colorful acorns would be really tempting to taste and choke on. This should be common sense, but I felt I had to say it as a responsible parent of itty bitty folks. 🙂
I definitely recommend buying this game! I’m not being compensated for this review, just recommending and sharing a great product I think other families would love as much as we do, but I would be thrilled if you would purchase it through one of my Amazon affiliate links in this post, above and below. It costs you nothing, but it gives me a small commission to help take care of these cute little rascals. 🙂
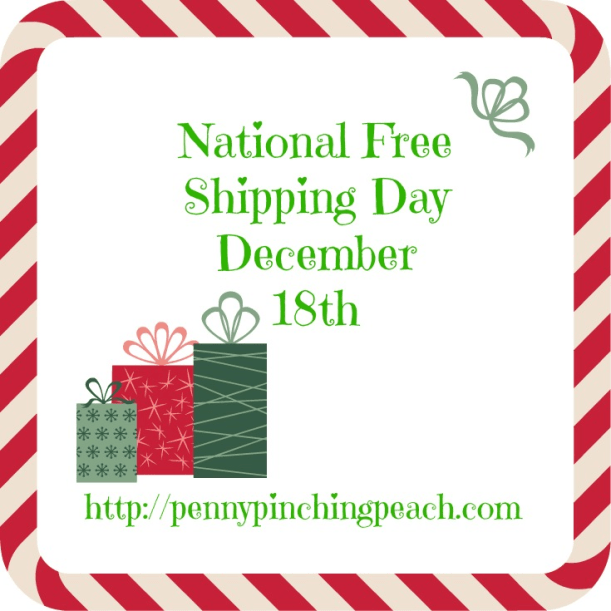
December 18 is National Free Shipping Day, with no minimum orders and hundreds upon hundreds of participating retailers….and guaranteed delivery by Christmas Eve!!
For the frugal procrastinators among you, or just those with something they need to order for later, this is a humdinger of a day!! Which retailer are you going to order from?
One of my favorite traditions I’ve established with my little ones is to make new tree
Jingle Bell Ornament
ornaments each year and to make some sort of fun & yummy Christmas treat together every year. Last year we made Beaded Christmas Ornaments. This year I decided to try the classic salt dough ornaments, which was a first for both me and my five year old daughter. They are simple to make, and so much fun! If you choose to do these, allow for at least an hour to mix and knead the dough, cut the shapes and then let them bake for 30 minutes. You’ll need to allow them to cool, and if you won’t have time to paint then, just put them up to paint another day. I’ll share the link to the recipe I used at the end of the post.
First, we had fun measuring, mixing and kneading that dough.
Shaped ornaments
“Penny Pinching Peach is a participant in the Amazon Services LLC Associates Program, an affiliate advertising program designed to provide a means for sites to earn advertising fees by advertising and linking to Amazon.com”
Next, we enjoyed choosing the cookie cutters to use and pressing out all the fun shapes
Snowman and Stocking Ornaments
we’d chosen. This set gives a great variety to choose from Set of 6 Christmas Cookie Cutters
! I rolled a little ball and pressed it on the face of one snowman to see if it
Christmas stocking ornament
would turn out okay as a nose, and it really did.
We wound up with so many shapes already, I molded some various fun figures with the leftover dough for a second batch to cook up. I also pressed each child’s hand into the dough and cut out the print, which is probably going to be one of my favorite keepsakes for the tree.
Once the ornaments were baked and cooled, I set out newspaper, paints and
bowls of water. I let my little missy paint hers however she pleased, as you can see from the various pictures. (Washable Kid’s Paint
is your friend!) I painted one with her, which made her really happy, too.
Painting ornaments
Once they were dry, I let her glue shiny shapes onto a couple of her ornaments, and she thought that was quite the fancy touch.
We were supposed to seal them, but I don’t have any sealant, so they are just going without for now. I want to get some Mod Podge Sealant
before we put them up so they will last.
I had some gold cord already in my craft stash, so I just cut lengths of that and knotted them, then let my little girly girl hang them on our tree. She was over the moon with the results. She also said making ornaments with Mommy was one of her favorite things she’d done in a long, lonnnnnng time! Good enough for me. 🙂
What shapes would you want to make your ornaments in? Here is the recipe we used:
Want a busy time activity for little ones? How about making cupcake wrapper flowers? I originally saw the idea on another blog somewhere, but adapted it to the materials we had on hand at our house and the way my daughter wanted to do it.
We used:
Cupcake wrappers
Twigs
Twisty ties (like come on loaf bread)
Buttons
Sweet smelling body spray
Feel free to make substitutions on any materials. Remember, we just used whatever we had on hand.
Stringing buttons
Stack the buttons in whatever pattern you want or even just use one button, stringing them on the twisty tie. Poke holes in the cupcake wrapper (I used an ink pen with a button as a template). String the twisty ties through the holes, attach the twig to the back and twist the ends around it firmly.
Smells yummy!
My daughter loved the next part. I let her pick out a sweet smelling body spray, and spritz all of her new pretty flowers. She loved smelling them, and had me reapply it every week or so to keep them smelling like delicious.
Tada!!
My daughter was so proud of her handiwork. She’d had so much fun gathering up twigs that were just the right size, selecting the perfect buttons, and helping me put it all together, she could hardly wait to show them off.
Baby food jar vase
Of course, with such gorgeous blooms to display, I had to come up with a vase to showcase them in. What else would I use in a house with little ones other than an empty baby food jar? I let my daughter decorate the jar with sparkly jeweled sticker things, which she thought was just the right touch. She set her beautiful bouquet proudly on the shelf at the head of her bed, ready for sniffing and seeing at any time. 🙂
This is such a simple, sweet craft with materials most of us have around the house. It definitely works for both my penny pinching side and my creative side. What are some things you have lying around your house that you’d love to find a creative use for?

 ! ♥
! ♥