Most folks who are avid canners also appreciate the art of saving a buck. I have gathered together a few ways for myself and other savvy food savers to preserve their food and pennies at the same time. Read ’em and whistle! 😉
Outdoor Cooking is running a special through August 18, 2014, giving you 20% off of canning stoves and canning supplies when using the code CANNING14. This code only applies to items in the Home Canning category, but it is a fantastic savings!
Ball has a coupon for 10% off using the coupon code C88367. If you need me to explain who they are, you probably have never seen a shiny new mason jar in real life! 🙂
I found something that says you can get a free jar scraper with any online order from Canning Supply using the code CS2013JS or a free set of four wooden corn on the cob holders with any online order using the code CSS812A.
Please note that I haven’t used any of these bargains. I discovered all of them through sources I have found accurate and useful in the past, so I have every reason to believe that they are valid, but I certainly can’t guarantee anything without having used them myself. Please let me know if you try them out!
“Penny Pinching Peach is a participant in the Amazon Services LLC Associates Program, an affiliate advertising program designed to provide a means for sites to earn advertising fees by advertising and linking to Amazon.com”
I decided to come up with healthier versions of premade snacks my kiddos can just open the fridge and get out when I’m in the middle of something.
My kiddos are always munching away, and often get hungry when I really don’t have time to make even a quick snack. By the way, I actually do tell my kids when their food is healthy, because I want them to know they are eating well and still enjoy what they’re eating instead of thinking junk is better. It sounded cute, though. 😉
Here are a few of my ideas for quick and healthy snacks…
One idea I came up with for inexpensive premade snacks of the healthy variety is to chop up some veggies into little stick shapes, get some ranch dressing or other preferred veggie dip and put it all together in a two sided container. In this case, I used a KFC Go Cup, because it is about the right size and already divided into two sections for the two parts. I have a lot of cucumbers from the garden and carrots are cheap, so that was my choice for this particular cup. Some other suggestions would be celery sticks, cherry tomatoes, sugar pea, broccoli, cauliflower or baby carrots.
*Penny Pinching Peach is a participant in the Amazon Services LLC Associates Program, an affiliate advertising program designed to provide a means for sites to earn advertising fees by advertising and linking to amazon.com.
The above suggestions have to be refrigerated if not being used immediately, but the ideas below are good for a snack drawer or shelf the kids can free range graze. 🙂
In small sandwich baggies, put in handfuls of homemade snack mix. One that I tried recently was Taco Seasoned Chex Mix. It could be adapted with your own seasonings you’d normally use in tacos, I was just trying it following their recipe to start. I like that it has very little sugar (a small amount in the cereals) and is fairly filling.
Another sandwich bag filler is GORP: Good Old Raisins and Peanuts. I mix two parts each of raisins and peanuts with one part M&Ms or chocolate chips, and it is soooooo yummy! I wouldn’t call it a health food, but it will fulfill your kiddos’ junk food cravings without allowing them to completely binge on sugar.
You can whip up a batch of my Yummy Oatmeal Banana Healthy Cookies and put a couple in each baggie for a great quick and healthy snackeroo that will satisfy even a hungry hubby. 🙂
This premade healthy thing can be applied to simply putting various fruits, veggies or nuts into serving sized containers for your kids to grab at will. Children tend to eat what is easily accessed, just like adults, and it is up to the grownups in their lives to provide them with solid choices.
What are some of your favorite homemade convenience snacks? Need more snack ideas? Check out After School Snacks!
I always I try to stretch a dollar while feeding my family with healthy foods is to keep a garden and put up what we won’t eat while fresh for later.
To be honest, I haven’t progressed to the point of having a humongous garden to provide limitless bounty to can for stocking a huge pantry of shelves I don’t yet have. I was raised doing it, but haven’t been able to do it myself yet as an adult on my own. This year I have a little semi raised bed measuring roughly 16′ by 3′, plus a few potted veggies. It won’t provide enough food to last us year round, but it does provide a large chunk of our produce for the spring and summer, plus a bit to put up for later.
*May contain affiliate links, which help my little family without costing yours any extra.*
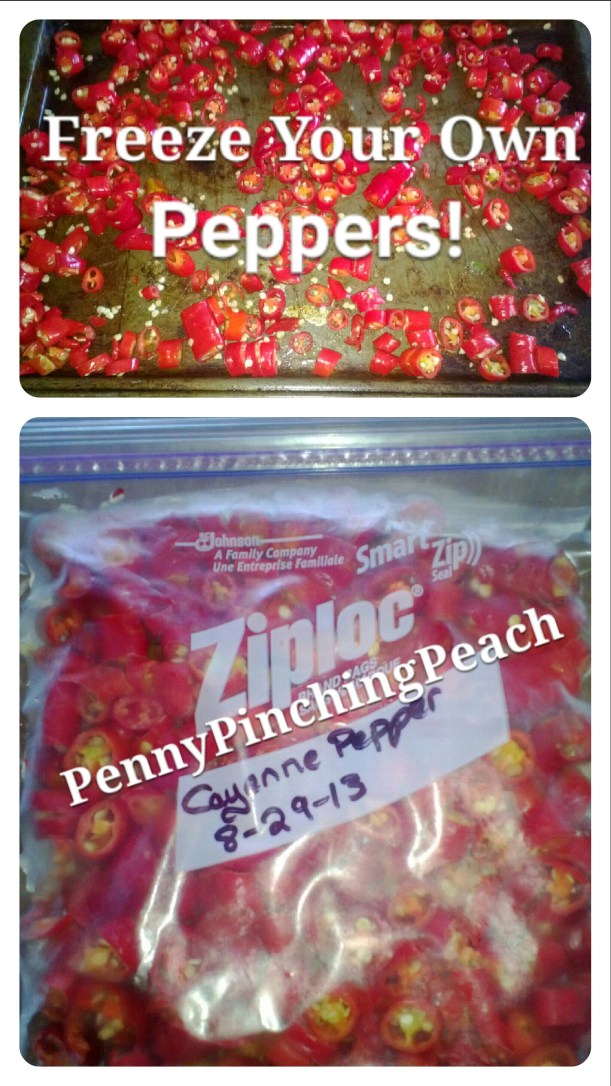
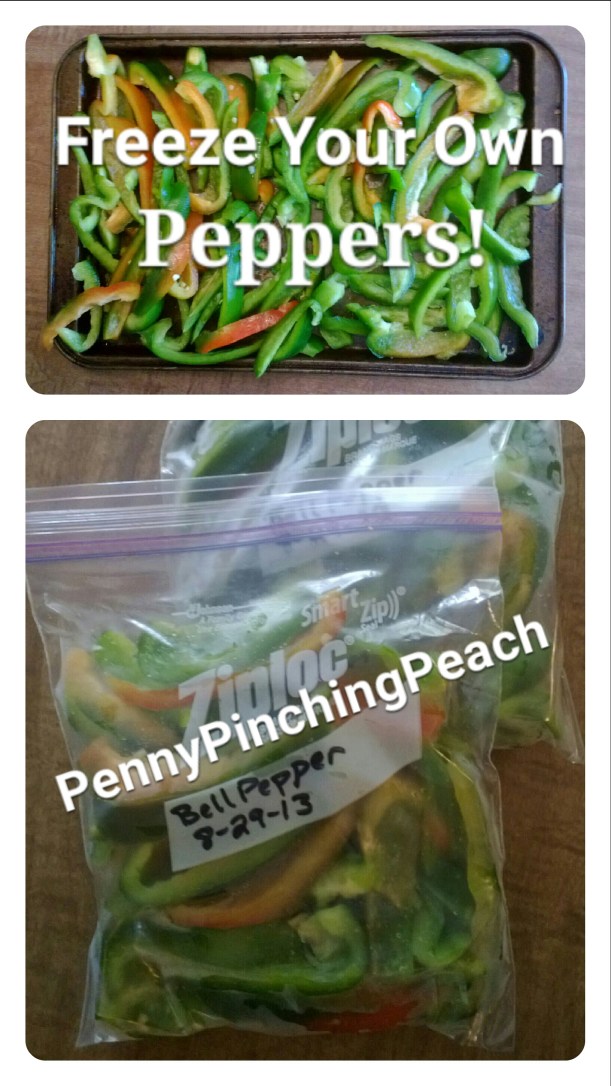
One of my favorite vegetables I put up last year was excess peppers.
Order non GMO seeds and supplies using the coupon code SAVE10NOW for 10% off at SeedsNow!
Since I don’t get enough of anything at once to make a big batch of anything, I tend to freeze things more than canning. I can always can most things later if I get enough of something frozen and want to make a sauce or jelly or some such delicacy out of them. I froze bell peppers and cayenne peppers to use in cooking.
Wanna know how to do it yourself? Here’s how I froze my peppers…
Preserving Your Own Bell Peppers!
Wash and seed peppers, then slice and lay out on cookie sheets. Pop them in the freezer just like that. This step keeps them from clumping together in a big mess in your freezer bags. I left them in for about an hour, then got them out and tossed them into labeled freezer bags. I squeezed out all the air I could before sealing, then laid them flat to freeze. They should keep like this for at least several months. I still have a couple of bags left from last August, and they are fine & dandy.
Which veggies and fruits do you prefer to freeze to keep them fresh & yummy? Which would you like to try freezing, but haven’t yet? Go see how I made some great diy topsy turvy style tomato planters!
My family loves to eat yogurt, but I’ve ran into a couple of problems with the pre-flavored yogurts available at the store.
First off, they are getting too stinkin’ expensive for my taste! Second, there is a ton of sugar, artificial dyes and extra junk I can’t even pronounce added into most of them, and I’m not too crazy about that when I’m trying to make a healthy choice by eating yogurt in the first place.
So, being the penny pinching peach that I be 🙂 , I decided to start experimenting with making my own flavored yogurt, starting with the big (and much cheaper!) tubs of plain yogurt.
The first thing I tried was a recipe I found for chocolate chip cookie dough yogurt. It was just a couple of scoops of plain yogurt (Greek or regular works, although the recipe asked for Greek), a couple of scoops of creamy peanut butter, a sprinkling of vanilla extract and a small handful of chocolate chips. It was surprisingly good!
Next, I used some of my son’s baby food to flavor some of that same plain yogurt. Both of my children were crazy about it! It actually tasted very similar to the store bought fruit flavored yogurts, just slightly less sweet because there was no sugar added. This one is 100% healthy and sugar free, which is fantastic since too much sugar makes my munchkins act like they’ve been transformed into the Energizer bunny until all hours of the night. 🙂
Banana baby food and a generous dollop of peanut butter mixed into yogurt was a definite hit, with both my daughter and myself! Some other baby food flavors I’d suggest: strawberry banana, apple blueberry (sounds weird, but my kids loved that one), peaches, banana, apricot & mixed fruit…pretty much anything fruity that sounds yummy to you will work.
My husband brought me a yogurt mix treat the other day, bringing with it more yogurt mix-in inspiration. Try almond slivers, dark chocolate shavings or chips and shredded coconut. Can we say delicious? Ooooo, yeahhh! 😉
A winning flavor is mashed banana and peanut butter mixed together and then mixed into your yogurt.
Cinnamon, honey and raisins makes for a different twist, with flavors reminiscent of rice pudding.
Does anyone else flavor their own yogurt? What’s your favorite?
My daughter loves all things cutesy and yummy. Combining those two loves, I sometimes make her snacks or meals in cutie patootie delicious forms.
Princess Peach loves peanut butter on crackers. I take large round crackers, peanut butter and either craisins or raisins. I spread the peanut butter on the crackers, then make faces, flowers or sun designs with the craisins or raisins. She loves it!
Flowery Crackers
She also adores marshmallows, so that was an obvious one to make a crafty critter out of. I took eight small pretzel sticks, painted a smiley face on a flat side with one of the pretzel sticks dipped into a drop of Hershey’s syrup, then jabbed them in the sides of the marshmallow to look like spider legs. This would be a fun and easy snack for those who celebrate Halloween.
Happy Spider
We often have sandwiches for lunch. Sometimes I’ll cut it into triangle shapes and put a large cherry tomato in the middle, all arranged like a flower. I’ll also take a cookie cutter and cut three or four pieces out of the sandwich in whatever shape it is.
Flower Sandwich
There is an endless array of cool things you can do with food! I only do the quick, easy and cheap varieties myself, since I am actually chasing around the kiddos I’m feeding, but I’ve seen some “food art” that would break your heart to eat.
Does anyone else like to get creative with food for their munchkins sometimes for no reason other than making them smile? 🙂
I must admit. This recipe was born from the same place many of my “recipes” are born from: It was simply a case of me wanting something quick and easy to make to fill up my family’s grumbly tummies with ingredients I had on hand. I actually had leftover mac and cheese when I first made this, and just scrounged around the cabinets for something different to make a dinner-in-a-dish with my leftovers. My kiddos really enjoyed this Mexi-Mac, but if you don’t like any spice at all, you could probably do it with plain diced tomatoes or half plain and half the kind with chilies. It would be good with ground beef added, as well. There are so many ways this could be changed up, and it would still be yummy. It’s really just up to your family’s tastes and what’s in your cabinets that day. I’m the queen of playing with recipes to make them work for my family better, or just to use ingredients I don’t have to run out and buy. 🙂
Mexi-Mac
1 10 ounce can Rotel mild green chili and diced tomato
1 16 ounce can black beans
1 box mac and cheese, prepared according to the instructions on the box
1/2 cup shredded cheddar cheese
Preheat oven to 400 degrees.
Mix Rotel, beans and mac and cheese together in a 9X13 baking pan.
Sprinkle cheddar cheese on top.
Bake for about 20 minutes or until everything is warmed through and cheese is melted.
Enjoy!
*keep reading*
Do you have any dishes that were inspired by leftovers? Does you family eat leftovers or turn up their noses to them? I know some folks hate leftovers, but we hate wasting ours! We often eat them just reheated, but almost as frequently we have leftover makeovers. Sometimes you wouldn’t even know what the original meal was. Yep, I’m that good! 😉
There are no coupons for these specific ingredients, but they are so inexpensive that it almost doesn’t matter. There is a coupon for frozen Hanover beans here, if you want to try those, though: http://www.coupons.com/coupons/Food-Coupons-107/
This is one of those recipes I love, because it has your veggies for the healthy appeal, your hot dogs for the kid appeal, and the ease of throwing it together for the busy person appeal! It’s also very budget friendly, which teetotally appeals to the penny pincher in me! The doggie in the picture isn’t exactly the kind that goes in this casserole, but I think she’s pretty cute! I hope y’all enjoy this recipe! I’d say it’s a keeper. 🙂
First comes the recipe…
♦ Hot Dog Casserole ♦
16 hot dogs , cut into 1/4-inch slices 2 (15 ounce) cans cut green beans with liquid 2 (14.5 ounce) cans stewed tomatoes with juice 2 cups shredded mozzarella cheese
Preheat oven to 350 degrees F (175 degrees C). In a 2-quart casserole dish, stir together sliced hot dogs, green beans with their liquid, and stewed tomatoes with their juice.
Bake in the preheated oven until the juice is thickened, about 45 minutes. Remove from oven, stir again, and sprinkle the casserole with mozzarella cheese. Heat the broiler of the oven, and place the casserole under the broiler until the cheese is melted, bubbling, and just starting to brown, about 5 minutes. Keep an eye on it, as the broiler works quickly and could burn.
I was given the Liebster Award by two of my fellow bloggers- My 3 Monsters http://my3monsters.wordpress.com/ and WAHMs Live Green http://www.wahfamilieslivegreen.com/. Both ladies have blogs that run pretty true to what their titles hint at, and I’d encourage everyone to check them out. I’m truly flattered to be thought of for this award, and am nominating some wonderful and different bloggers myself this time around. I tried to make this fresh, but some of the facts about me are just the same. 🙂
These are the Liebster Award rules; “When nominated, the blogger must list eleven facts about his/herself, answers questions given by the nominator, and come up with eleven questions for the bloggers he/she nominates.” The bloggers are also supposed to have under 300 followers.
Here goes something!
♥ Eleven Facts About Penny Pinching Peach♥
Hubby Training
•I probably have one of the hardest working husbands in the world. He’s a firefighter/paramedic, and I’m very proud of the fact my husband is willing to save lives and help others for a living.
•My dream growing up was to be a mommy and…..whatever else. The only unchanging part was that I wanted to be a mommy. My two munchkins? Crazy little dreams come true! 🙂
•I come from a long & proud line of penny pinching peaches.
•I was peeling taters in the kitchen with my mom when I was 7. I’m passing on the helping-in-the-kitchen-early-on tradition to my little girl, who already puts up freshly washed silverware and crushes cans for recycling at the ripe ol’ age of 3 1/2.
•I was homeschooled, graduating at age 15 in the top 1% of graduating seniors nationwide.
•I lost my mom in 2006, and I miss her every day, but she lives on in the hearts of all who loved her.
•I love doing crafts, but haven’t been able to do as many crafts since having babies.
•I am a lifelong bookworm, but that is yet another neglected hobby of mine since having little ones.
Chicks and Chica
•I love cooking and baking. Feeding folks the vittles I stir up is just the icing on the cake!
•I taught myself calligraphy when I was in middle school. That seems like an obscure and useless skill, but it has come in handy to add a bit of pizzazz to the lettering when making cards.
♥Questions From My 3 Monsters♥
1.Why did you start blogging? Several reasons, one being that friends & family encouraged me to officially share what I’d been sharing unofficially forever. 2.What inspires your blog? My family, frugality and random things. 3.What is your favourite holiday and why? Christmas, because it brings my little ones so much joy. 4.What is an important tradition in your family? Right now? My daughter “trick or treats” for prizes when she goes potty. We’re still forming our lifelong traditions, though. 🙂 5.How many children do you think is the ideal number to have? I think it varies according to the family, honestly. For some, that number is none or one. For others, it is 5 or 10. I’m not sure what it is for us yet, but I hope it’s at least one more than we have. 🙂 6.What is your family’s favourite meal? Hmm… that’s a toughie! My family loves my chicken and dumplings. Ritz cracker chicken and chicken livers with mashed taters & green beans. A creamy chicken concoction I tried recently that the hubby called the “best chicken ever”. Chicken, apparently?? lol
I Cook Good, Mommy!
7.Any suggestions for picky eaters? (This question is purely for selfish reasons!) My little ones generally eat well, but when my daughter goes through a picky patch, I get her input on meals. I’ll say “Shell noodles or curly?” or let her help mix things, dump ingredients in a bowl….pretty much anything to be involved with the meal. When kids help make something, they usually eat it. 🙂 8.What is your dream vacation? Happy, peaceful, warm, and without some weird agenda? lol 9.What kinds of music do you listen to? Country, rock, Christian worship/contemporary. 10.Coffee or tea? Sweet iced tea. 11.If you could offer kids one piece of advice for the future what would it be? ONE?!? Don’t let what the rest of society is doing or thinking dictate your morals and ideas.♥Penny Pinching Peach’s Liebster Award Nominees♥
•You obviously enjoy blogging, but what’s a hobby you’re known for?
•What is your favorite way to save?
•If you could spend your weekend any way you wanted, what would you do?
•Do you have any pets?
•Which beauty item can you not live without?
•What is your favorite place to shop, online or offline?
•What two words best describes your personality?
•What is your favorite snack?
•Do you have any hidden talents?
•What would you like to be remembered for?
Congratulations to all of these fantastic bloggers!
I look forward to reading your replies and to continue keeping up with all of your fantastic blogs! Please visit and follow all of these interesting bloggers. I know you’ll enjoy them as much as I do!
It’s a beautiful spring day here in Georgia, and wonderful weather for a picnic! With this in mind, I’ve gotten together a perfect picnic for pennies on the dollar. Not only is this a cheap menu, but it is both a simple and unique twist on classic picnic foods. We’ve got a main dish, side and dessert, all very easy to throw together and equally easy on your pockets!
A healthier version of corn dogs…
Quick & Crunchy Hot Dogs
1/2 cup ketchup
1/4 cup prepared yellow mustard
1 cup cornflake crumbs (Total cereal may work, and it has a coupon)
1 (16 ounce) package all-beef Ball Park hot dogs
1.Preheat oven to 350 degrees F (175 degrees C). Line a baking sheet with a sheet of aluminum foil.
2.Stir together ketchup and mustard on a plate until mixed. Place cornflake crumbs in a shallow bowl. Roll each hot dog in the ketchup mixture, then roll in cornflake crumbs to coat. Place on prepared baking sheet.
3.Bake in preheated oven until the hot dogs are hot on the inside, and crispy on the outside, about 15 to 20 minutes.
An unusual side dish…
Awesome Brown Rice Salad
2 cups water
1 cup Hinode brown rice
1/4 cup diced red onion
1/2 cup diced celery
1/4 cup dried cranberries
1/2 cup balsamic vinaigrette salad dressing
1 tablespoon sugar
1.In a saucepan, bring water to a boil. Stir in rice, cover, and reduce heat to low. Simmer for 45 to 60 minutes, or until done (or use instant brown rice for quicker results).
2.Transfer rice to a serving bowl, and stir in onion, celery, cranberries, salad dressing and sugar. Cover, refrigerate, and serve cold.
And for dessert…
S’mores!
There is a rare coupon covering the three basic s’more ingredients- marshmallow, chocolate and graham crackers.
You can make them over a fire in the usual way. If it a backyard picnic, though, you can also put them together (without the top graham cracker) on a baking sheet and broil them until they are lightly browned and all puffed up, then just slap the top graham cracker on when you pull them out of the oven. Either way is a delectably gooey sweet treat to top off a nice spring picnic! 🙂
Our family loves spending time outdoors, especially this time of year when the weather is absolutely perfect for it! Eating outdoors is just one of many fun & frugal things to do in the springtime. There are so many things to enjoy outside for free or nearly free when it’s gorgeous out! What are your favorite picnic foods? Do you prefer to picnic at the park, in the woods, in a field, in your own yard, at a playground…what’s your preference?